This post describes my journey while studying SIT 206 at Deakin in 2018.
Student ID: 215299028
Student Name: Monty Panday
Week 1 Introduction to iOS development and Swift
The first week was all about introduction to iOS development and swift. I have to admit that I had no prior experience with building iOS apps, swift or even with using an iMac.
Just for a context, I have experience with C#, PHP, JavaScript and introductory level understanding of Java android development. I have worked on a Java android application and found the same concepts being used in iOS development as well. For example, the way we extend class to develop apps. Also, I have a good understanding of Object oriented development experience which helped me a lot.
In this week, we did not actually start with coding part. Even then I felt I was overloaded with the information just because there was lot of new terminology to learn.
Getting familiarity with XCode was the basic necessity. I explored the different options how you can use playgrounds to design UI, what are controllers, how swift deals with variables, functions, enum, structs etc. The most difficult thing at that time was to wrap my head around the concept of wrapping and unwrapping values.
I also must admit that at first, I had to search for a lot of things in order to get started. The right pane (utilities pane) have many options which can easily overwhelm a new learner.
Despite of all the above issues I never faced challenges using the swift languages. Most of the problems I faced at the start was related to my lack of knowledge of terminology. For example, after reading the Tic Tac Toe assignment requirements I was sure in my head that I would need a two-dimensional array to maintain the state of the game like I did in one of my previous quiz assignment here https://github.com/montypanday/Crozzle-Generation
By the end of the week, I was thinking about how to build the views using an image and 16 buttons or a CollectionView, so that the Tic Tac Toe game fits all screen sizes.
Week 2 – Introduction to UIKit
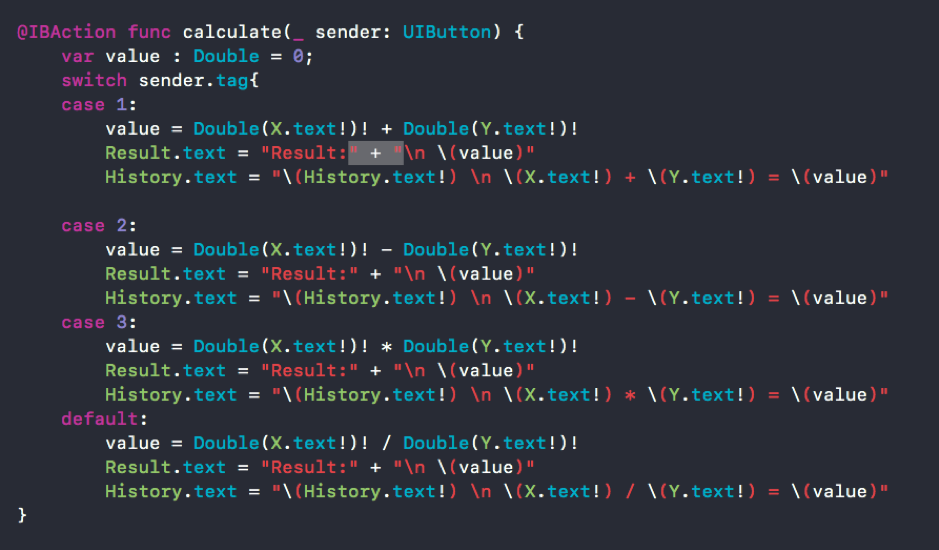
- Topic/feature/idea of the app This week we will be implementing a simple Light Lamp App and a simple calculator as described in Practical week 2.
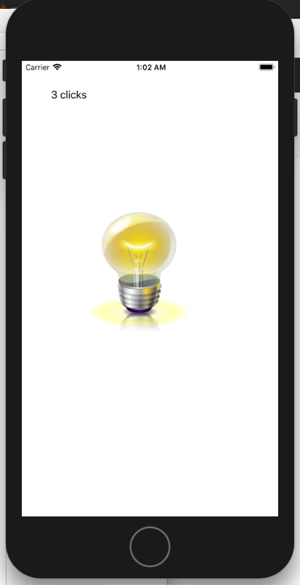
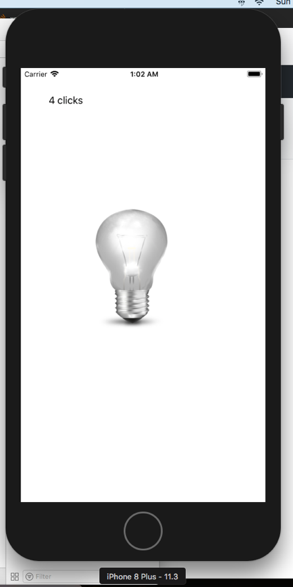
The Light Lamp app is a simple app in which the image changes when the user clicks on it. This gives the illusion that the user is turning the bulb ON/OFF. We also keep track of how many times the user clicked on the button to display a counter on screen.
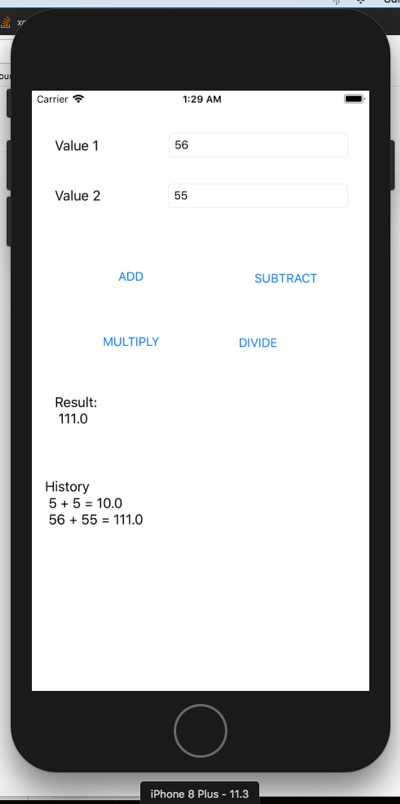
The Calculator app allows users to do simple calculations on two numbers. The results and history of all calculations done are displayed on screen.
- Snapshot of your app
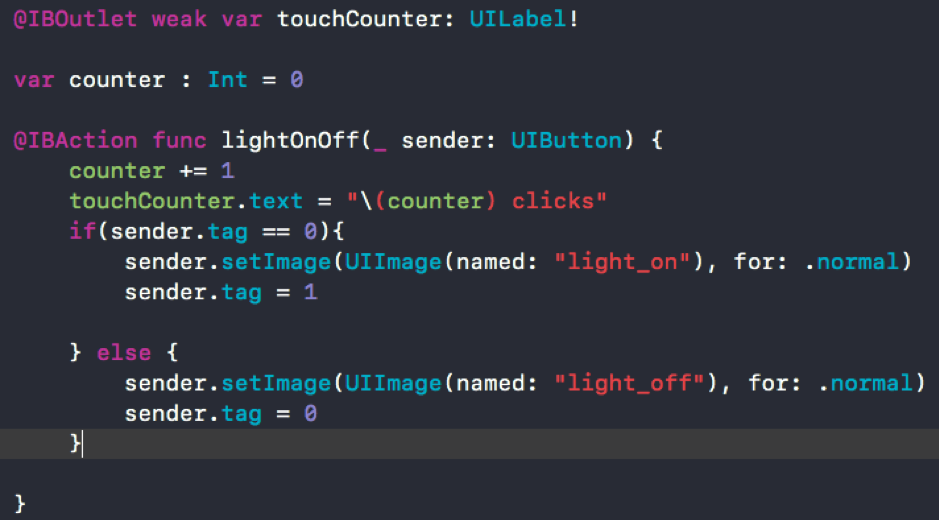
- How did you implement it? For the light lamp app, the following code handles clicks, changes the image and increments the counter
For the Calculator app, the following function defines and calculator logic. All we need is different tags on each UIButton to figure out which button was clicked.
- Reflection – Any further comments?
This week prepared me for the task that needs to be done in Assignment 1. I know how to listen to click events, preform logic, render and update the display. I got experience with images which will be useful when dealing with cross/zero images in Assignment 1. Having done this week’s practical well, I feel confident on starting with the Tic Tac Toe game next week.
Week 3 UIKit and Auto-layout
In this week’s practical, we made a simple memory game as described in the practical. Most of the logic and code was given in practical task so I do not claim it as my learning in this reflection. However, that helped me with the Tic Tac Toe game as we will discuss below
- Topic/feature/idea of the app
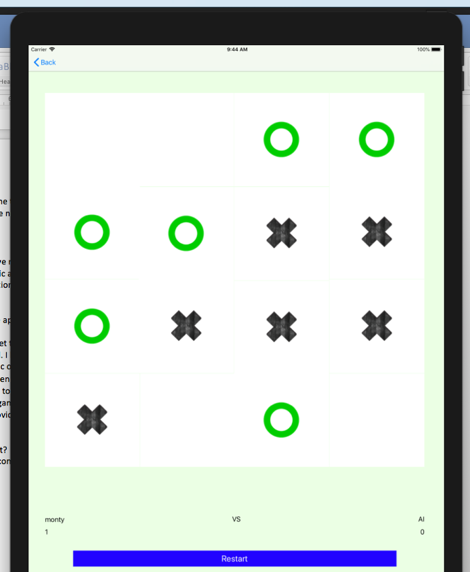
This week’s task was to get the Tic Tac Toe grid working. The example we saw in the practical was very helpful. I had to develop the grid on which the Tic Tac Toe game should work with the logic of
- how to decide when the user wins the game
- how to allow user to play the game alone (single player mode)
- how to reset the game.
-
Allow users to provide a name for themselves.
- Snapshot of your app
In order to get the auto layout working correctly, I had to add constraints to all the 16 buttons. Each button has the same width and height. I had to add constraints to determine the height, width and position of each of these buttons. The results are evident in the screenshots below.
-
How did you implement it?
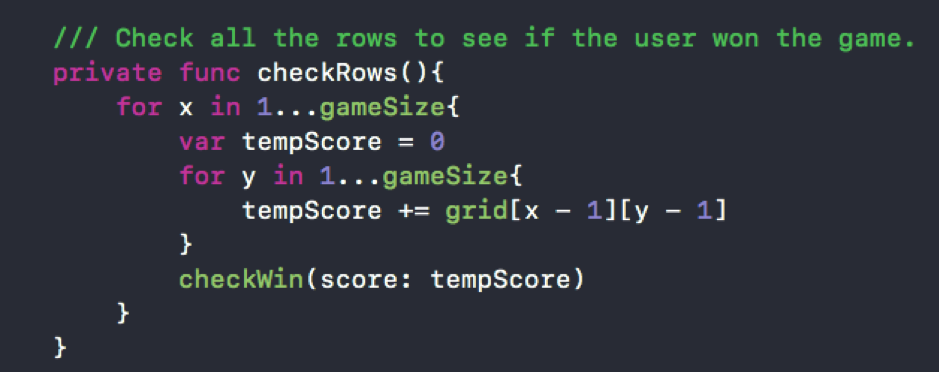
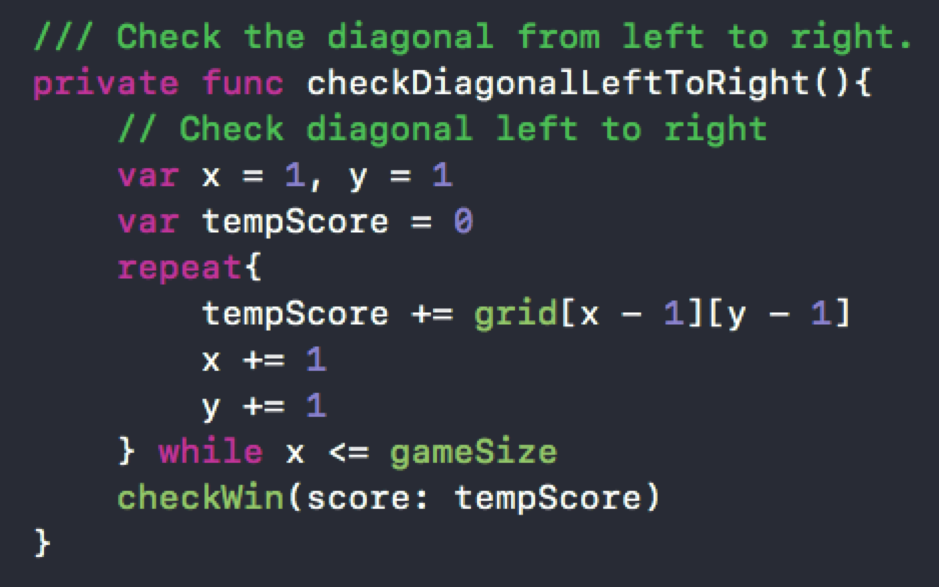
I had to do a lookup on my two-dimensional array each time a user clicks a button. I had to check all rows, all columns and both diagonals to check for any win condition before allowing the next user to play its turn.
For checking rows
The check for the columns is pretty similar, let’s have a look at the check on diagonals
And for the constraints

To determine which user wins the game. I had two constants say 10 and 1000 allotted to the two users A and B. When A user plays it turn, I put 10 at the same place in my two-dimensional array. In this way, I could see if sum of any row, sum of any column or sum of any columns is equal to 40 to see if user A won the game.
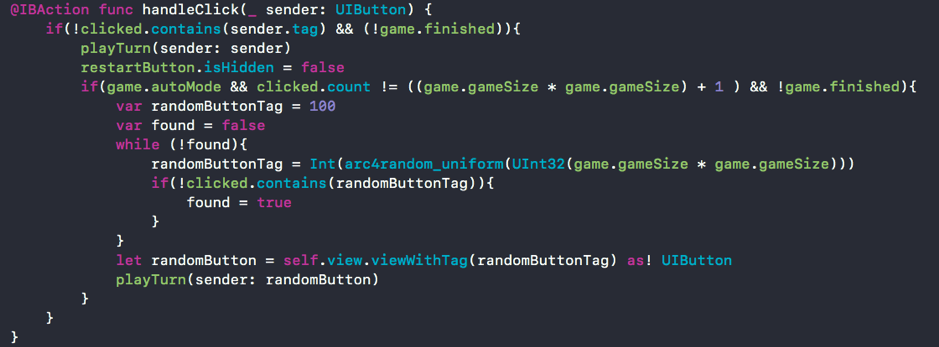
To simulate the AI user in single player mode My logic is to find a random button with a tag which is not clicked and simulate a click on it if the user is playing in single player mode.
-
Reflection – Any further comments?
I did not face any significant difficulty with implementing the logic for this grid. The only problem I faced was getting the buttons to display at correct places, with correct size and image location. It was a difficult task setting all the constraints and took most of the time.
As far as logic is concerned I broke the problem into many small functions. It made the code more readable and easy to work with.
Week 4 – UIKit and Music
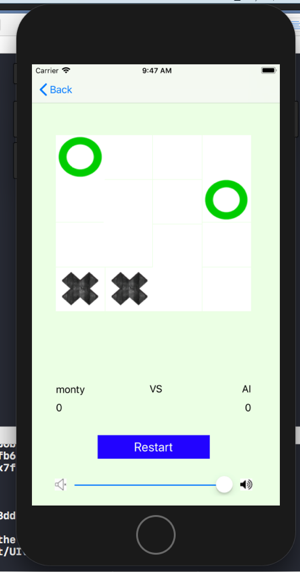
- Topic/feature/idea of the app This week’s task was to build a simple music player which could help me build my background music extension for the Tic Tac Toe game.
At the end, we will add an extension to the Tic Tac Toe game to get marks for an extra extension.
- Snapshot of your app
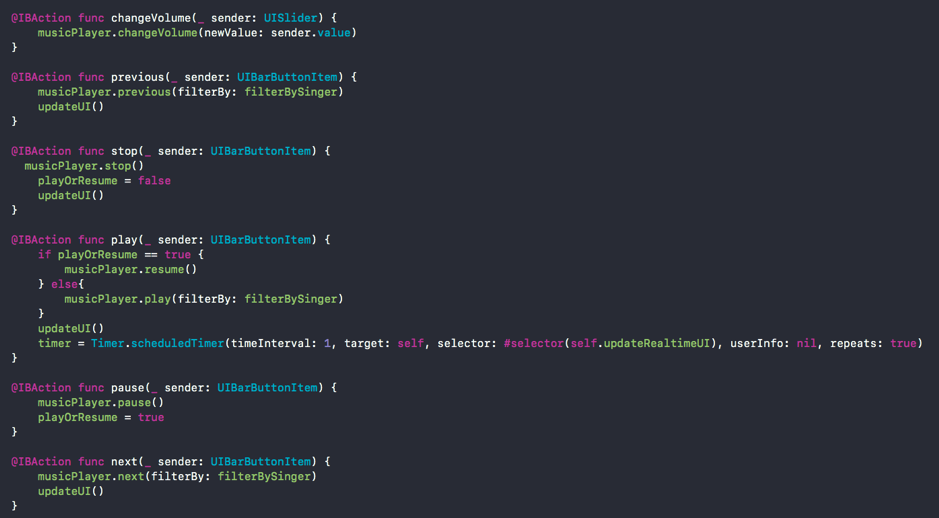
The simple music player app uses a collection of three songs. The user can click play, pause, next, previous, stop buttons, adjust volume and see the time ticking while the songs is being played.

- How did you implement it?
The simple music player is developed using the MusicPlayer class provided as part of the weekly practical resources. It is used in the following way
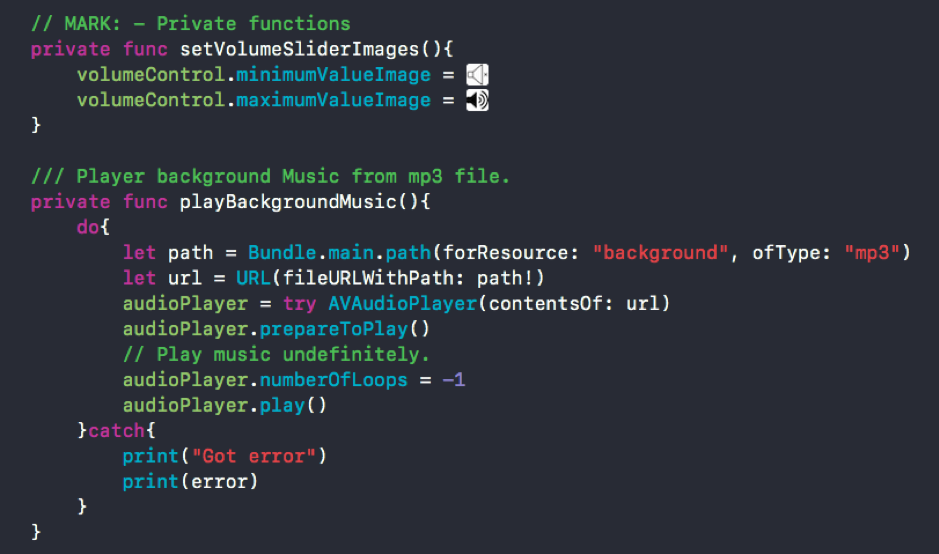
The background music extension in the Tic Tac Toe game was developed with the following code
And in each of the controllers
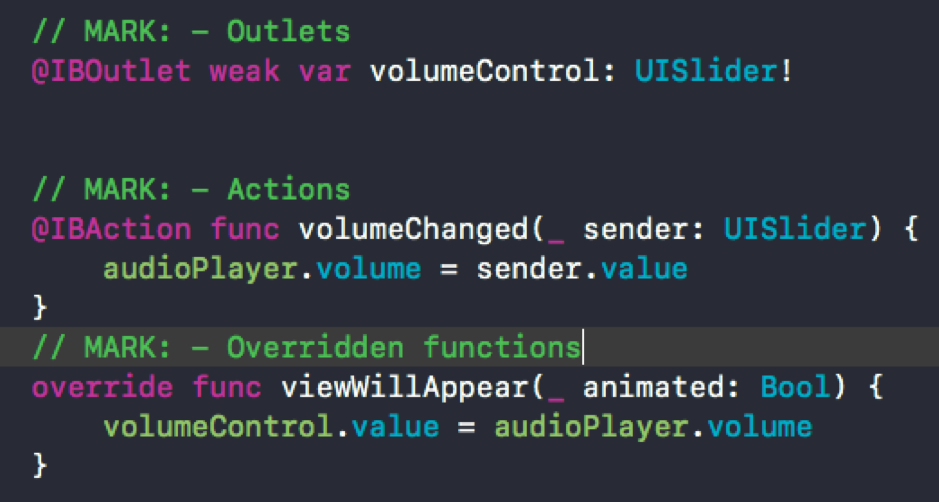
Please note that the volume is set in the ViewWillAppear function because it need to maintain the same volume when user moves across the application. For example, when a user decreases the volume in the root controller, it should be decreased in the any other controller views as well.
- Reflection – Any further comments? The practical this week was very helpful and provided me a solid understanding of dealing with audio controls. I will be much more confident when dealing with any background music, notification sounds etc. in my future projects.
Week 5 – Table View Controllers
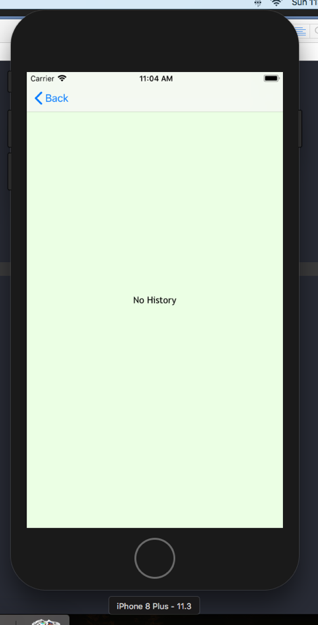
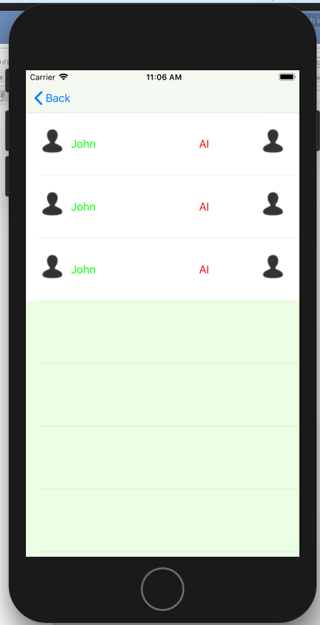
- Topic/feature/idea of the app Table views are one of the most common UI component which can be found in almost all apps. I needed a Table view in the Tic Tac Toe game to display a history of previous games played by the different users. The NetCrypt app I was working on also required extensive use of table views.
I first started with a simple Contact list app which displays all the users contacts in a tableview.
- Snapshot of your app
- How did you implement it?
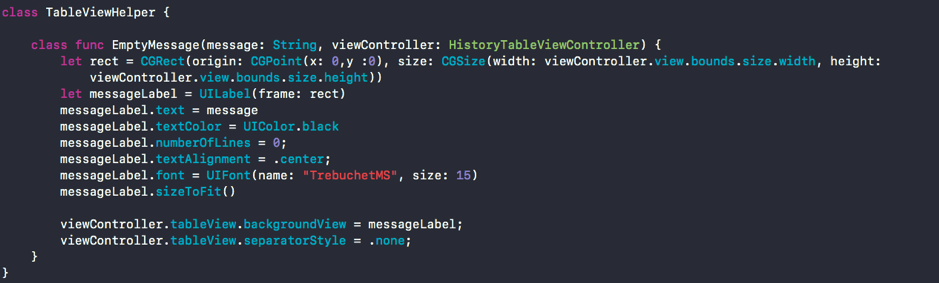
Figure 1 TableViewHelper to display a message when the table is empty
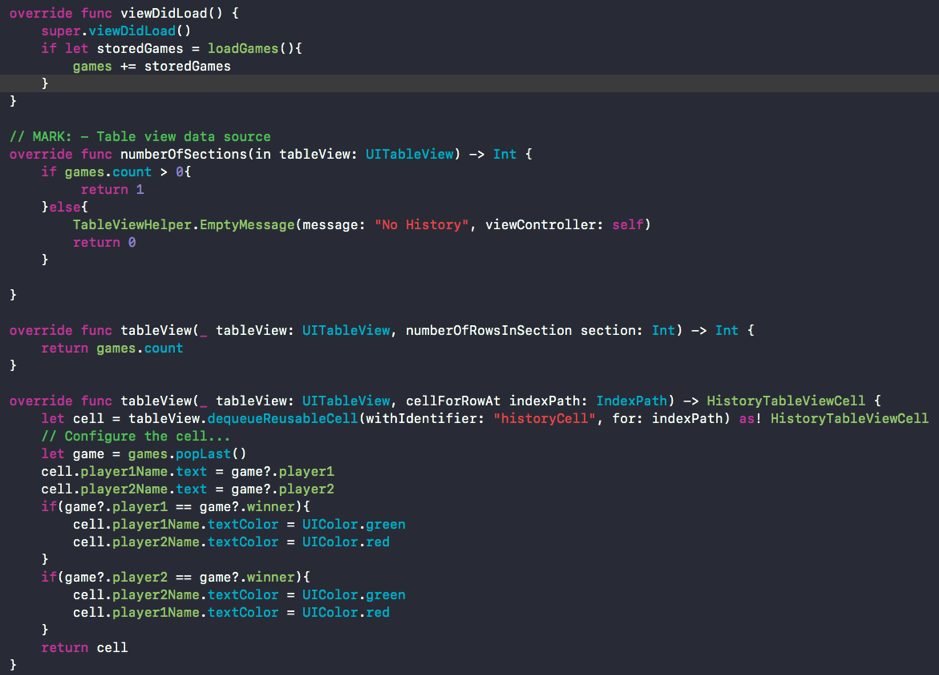
Figure 2 Code to display Historical games in a table
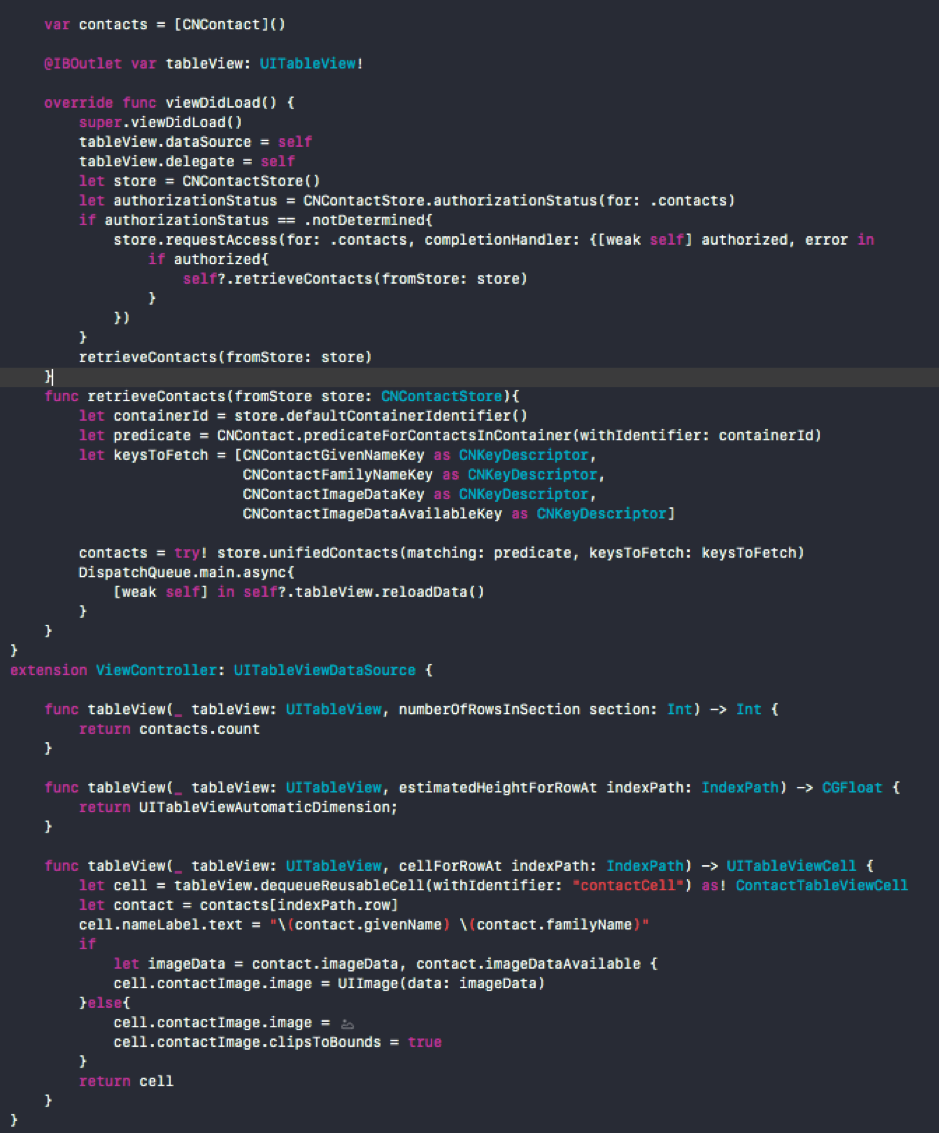
Figure 3 Display user contacts in a table
- Reflection – Any further comments?
Later, this experience with table views proved helpful when doing Assignment 2. Most apps use Tables for displaying data. This experience will help me in a longer run.
I learnt a few things related to tableview like handling the case when no data is available to display and what to display while you are fetching the data. We will talk more on it in the Networking section.
Week 6 Core Data
-
Topic/feature/idea of the app This week I worked with core data that will enable me to store games in local storage so that I can retrieve history of games played when needed.
-
Snapshot of your app

- How did you implement it? First of all, I needed a class that can be archived and retrieved when needed. I created a separate GameRecord class which extends NSObject and NSCoding like this.
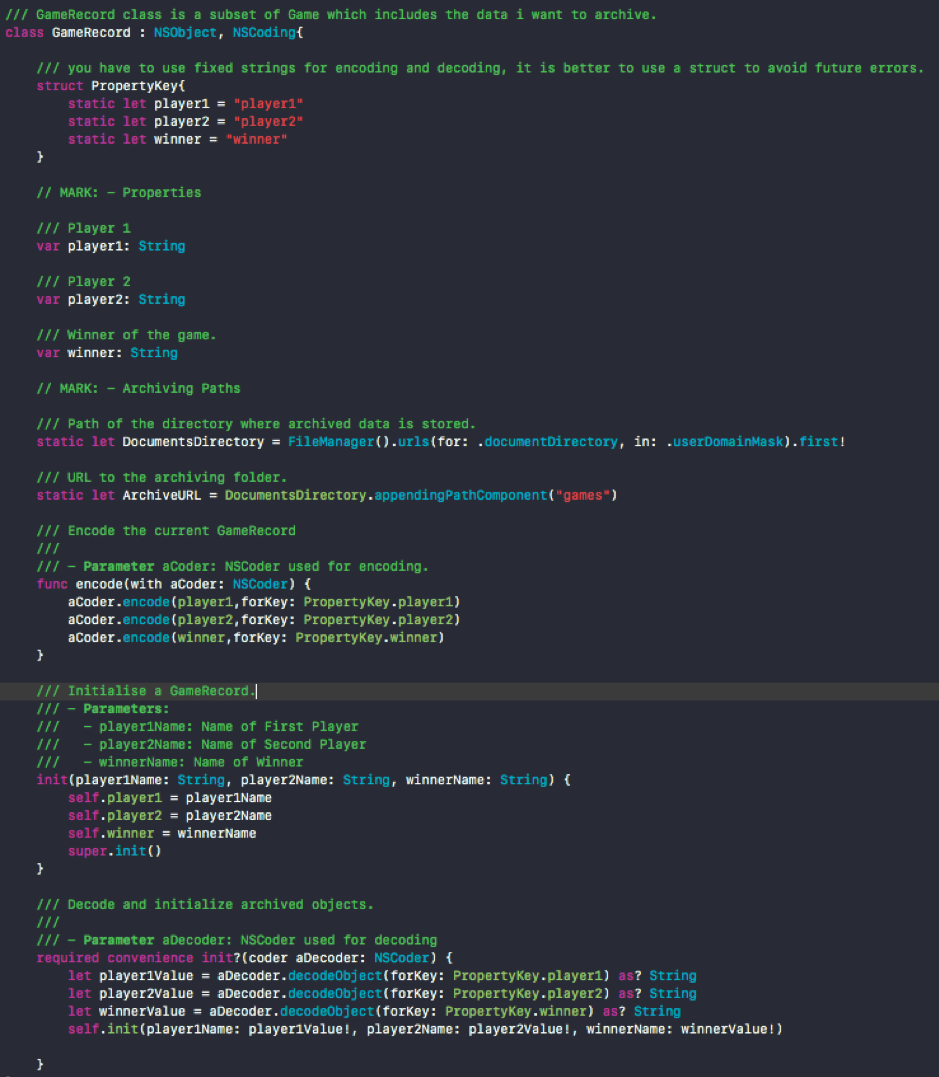
Figure 4 GameRecord class which will be archived/unarchived

Figure 5 Retrieving data from Core data
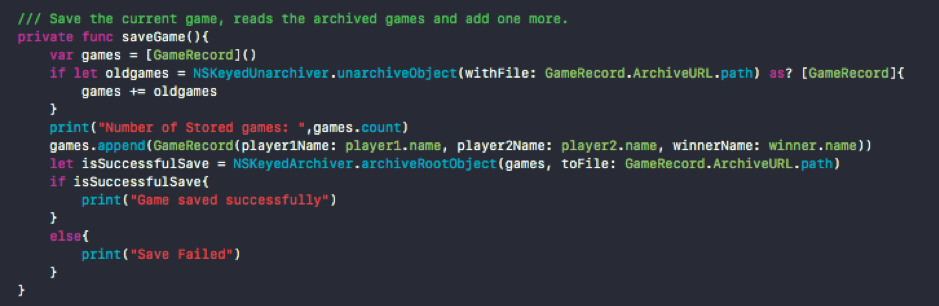
Figure 6 Inserting data into Core Data
- Reflection – Any further comments?
All apps have to store some data locally in order to improve performance. For example, networking apps which receive lots of json data from the API can use Core Data in order to improve performance and refresh it as needed. Another common use of core data can be to store additional data like user customizations, settings etc. in a variety of forms like binary, SQLite or in memory storage.
It should be noted that core data is way of managing objects using an object graph. It can use different forms of storage according to requirements.
Week 7 – 8 Consuming Web API’s
- Topic/feature/idea of the app The NetCrypt app I developed in Assignment 2 used an API to get data. I had to start working on the networking part of my assignment before Week 8 Consuming API lecture took place. I felt that Map Kit lecture will be of little help in my assignment and started working on networking by myself.
The aim of these two weeks was to get the data flow working in my NetCrypt app. It is to be noted that I had no documentation for the API and had to look into Java android project and an old objective C project to find what the endpoints are what data they receive and how they they use that data.
- Snapshot of your app
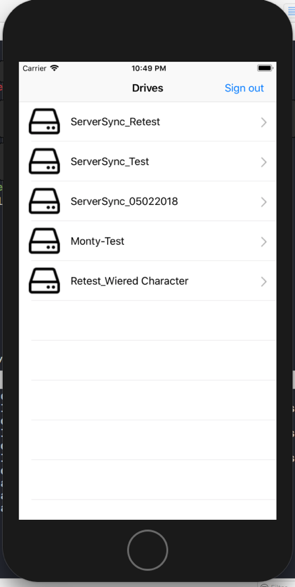 Figure 7 Get Drives after the user is logged in
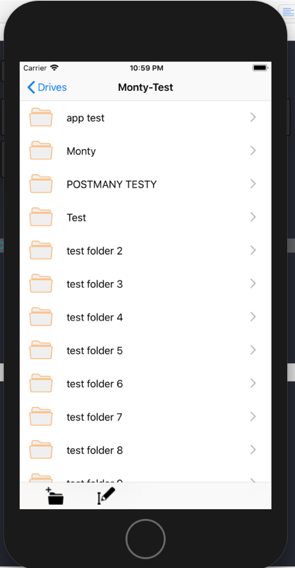
Figure 8 Get Drive Contents for a drive Other snapshots can be found in the Assignment 2 submission.
- How did you implement it?
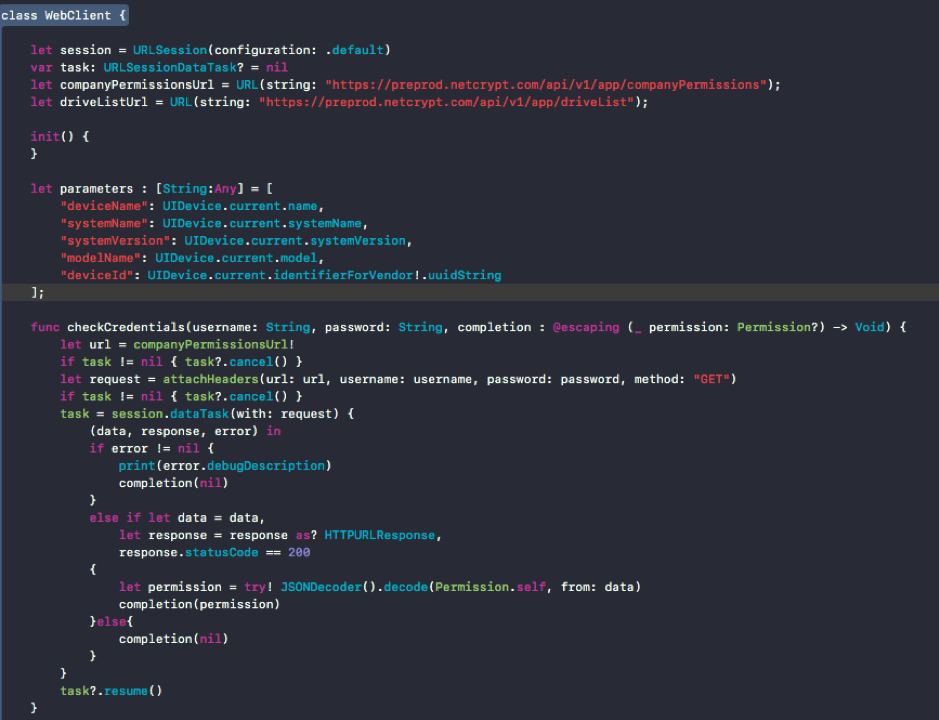
Figure 9 WebClient to make network calls
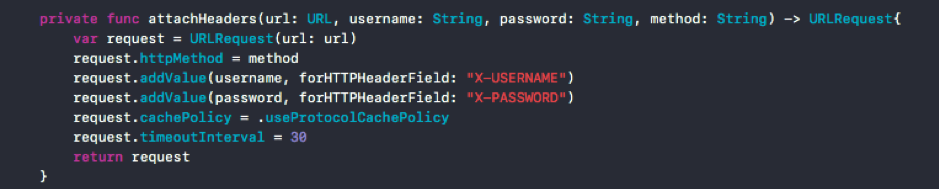
Figure 10 Create a custom URLRequest
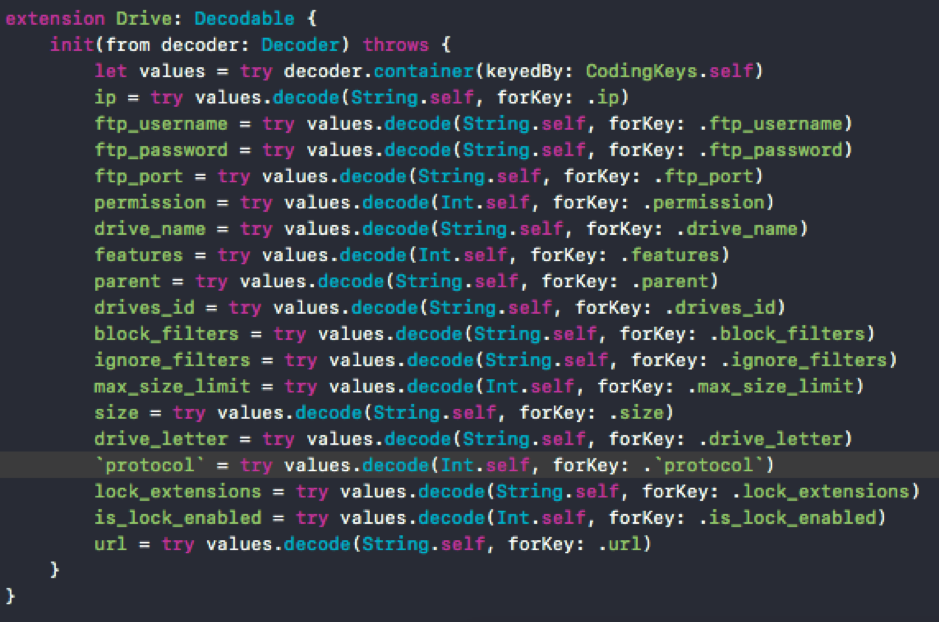
Figure 11 Decoding data into Structures
This assignment gave me an opportunity to practice my skills with Tables which we learnt in Week 5. I knew my assignment 2 app requires extensive use of network calls. I asked the Unit Chair for a way to manage all these network calls out of controllers preferably in a separate helper class.
The Unit Chair redirected me towards the Web Client he used in the lectures. I developed a similar Web Client which takes care of all network calls required in my app.
If you are familiar with concepts of JavaScript/jQuery, you may be familiar with a term called callback functions which you can pass to another function as a parameter. In Swift, callback functions are called Closures.
Therefore, in order to use this web client in my controllers, I could easily do it like this
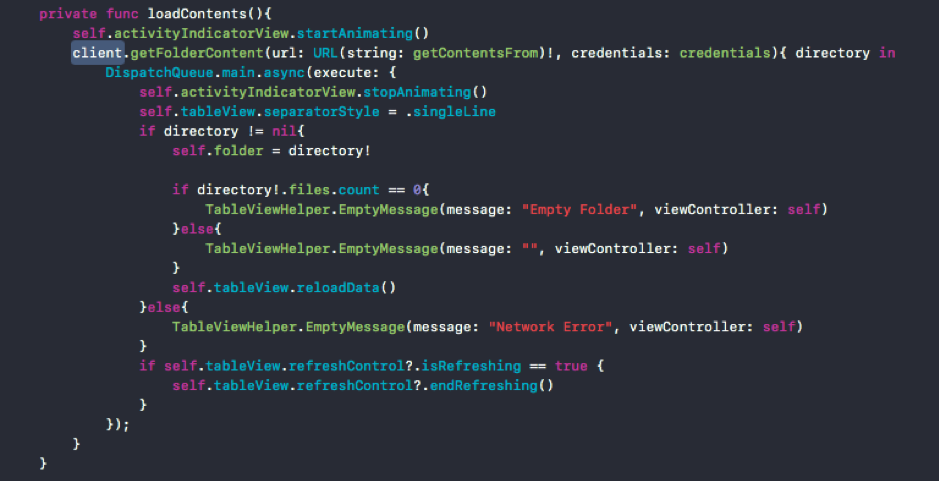
Figure 12 Loading folder contents using WebClient
- Reflection – Any further comments?
One of the biggest challenges I faced while trying to get the network calls to work was because of the fact that URLSession treats headers being case insensitive. Due to this reason, all my calls failed because NetCrypt’s API required the username and password to have headers X-USERNAME and X-PASSWORD. It did appear same in code but URLSession translated it to x-username and x-password which lead to the failures.
I had to visit the NetCrypt office, debug and find the error and ask them to correct it in their API.
Apart from that, another thing to be noted is that the network calls occur in a different thread/context. Therefore, in order to change something on the Main Thread (display), you must call that code within Dispatch.Main.async{}
Another common feature these days are gestures and handling network delays which we will discuss in next week.
Week 9 – 10 - Gestures, UIAlertController
- Topic/feature/idea of the app
In the last two weeks, the aim is to polish the assignment 2 NetCrypt App for submission and add UIAlert’s to display progress, authentication, loading, file/folder rename and create new folder behavior.
Pull down refresh gesture is what I believe is the minimum requirement of any app these days. All tables should refresh their data when pulled down. Another minimum requirement is to display something when a TableViewController has loaded but the network call have not finished yet.
- Snapshot of your app
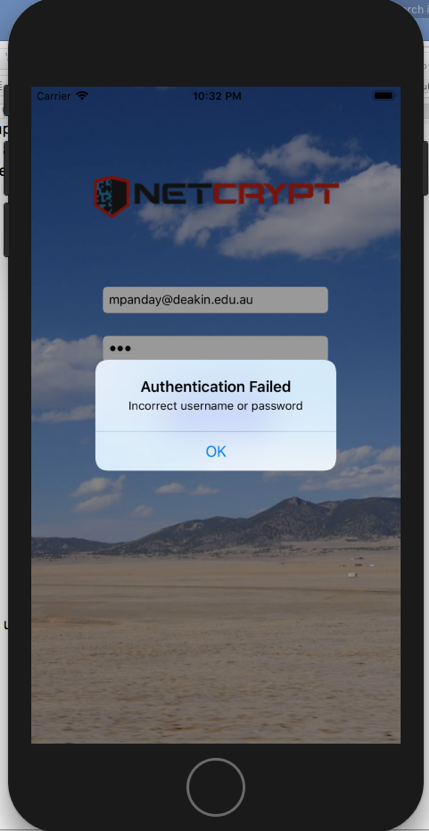
Figure 13 UIAlert when authentication fails
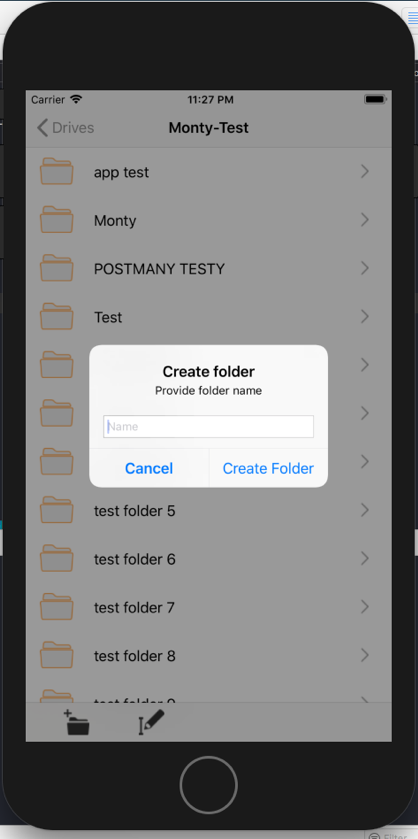
Figure 14 Create folder with a given name
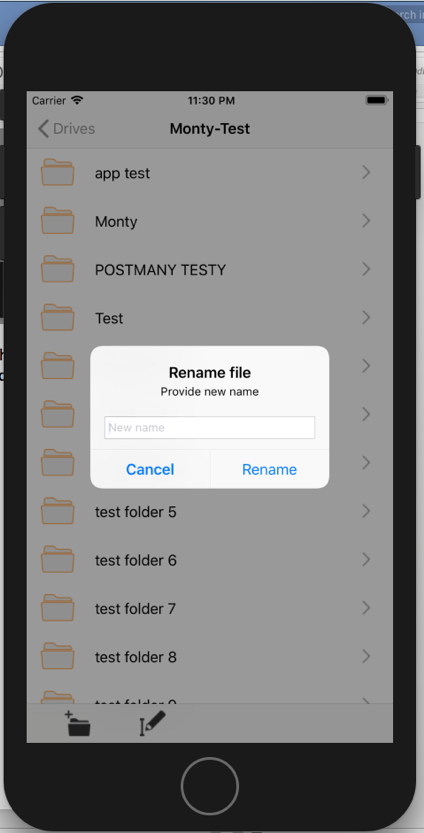
Figure 15 Rename a file/folder
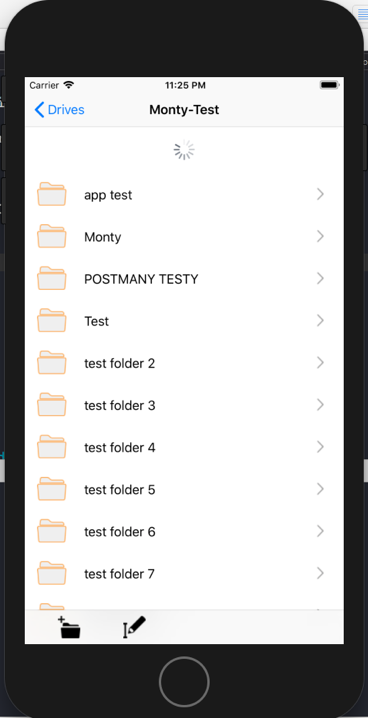
Figure 16 Pull down refresh across table views
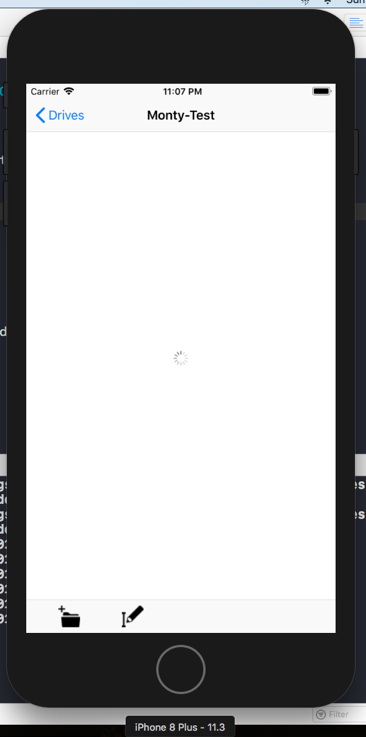
Figure 17 Loading Indicator when network call in progress
-
How did you implement it?
- How to implement pull down refresh?
var refreshTrigger = UIRefreshControl ()

// then, add a target which will be called, when the table is pulled down.
// Assign this trigger to the table view as a refresh control.

refreshTrigger.addTarget(self, action: #selector(refresh), for: .valueChanged)
    	self.driveTableView.refreshControl = refreshTrigger

//and then remember to end refreshing when done

if self.driveTableView.refreshControl?.isRefreshing == true {
                self.driveTableView.refreshControl?.endRefreshing()
            }
- How to implement pull down refresh?
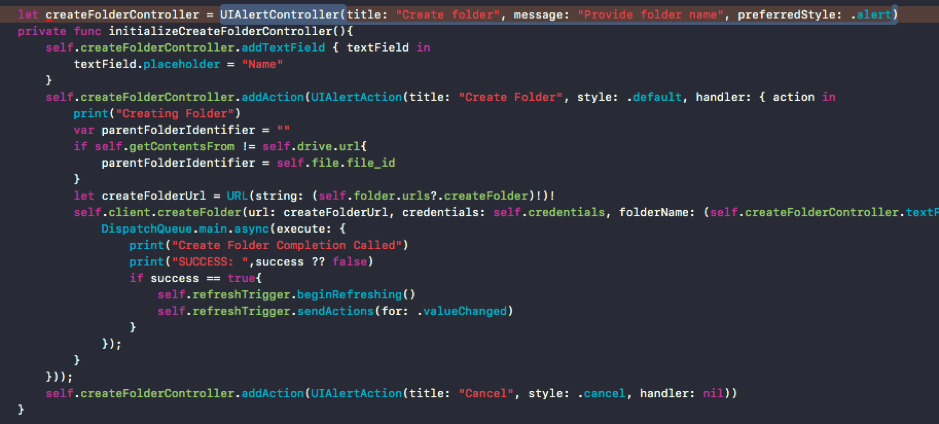
Figure 18 Create and initiate a UIAlertController
- Reflection – Any further comments?
This week I was primarily focused on refining and improving my work. I added UIAlerts which allows users to rename files and folders. Another alert to display a progress bar when the authentication is in progress. Another addition is the loading screen which is displayed when the user navigates into drives or folders and the network call is still in progress.
Overall reflection of the Unit
When I started this unit, I had no experience with Xcode or iOS development in general. At the start, I felt overwhelmed with terminology, but the practical tasks were very helpful. For the Tic Tac Toe app, doing the first 5 weeks of the practical tasks gave me enough momentum to approach the Tic Tac Toe game with some real experience.
The content of lectures was also very sleek and relevant to the current best practices. There were many helpful links related to Swift which proved helpful throughout the unit. The practical tasks were accompanied by a demo from our practical tutor in which he actually worked with the students, helping them with their problems.
Although, my Assignment 2 did not have any usage of MapKit, but I found the resources to be interesting and I believe I will have to refer to the lecture slides and practical tasks frequently in my near future.
Now, I am confident enough to start development apps using swift. iOS devices have a great market share and the fact that I now have some proven iOS development experience will definitely add a tick to my job profile. I believe the Unit covered all the important aspects from teaching us to use the UI components to using Core data and Interacting with API’s.
Overall, I enjoyed the whole unit and believe it will help me when I graduate this year.